I've recently been playing a lot of the newly released Blue Prince and I see a lot of complaints about RNG making it slow or difficult. While I agree that it can drag a bit at certain bottlenecks, I've been mulling over some general strategies that the game doesn't explicitly present to you and want to outline here.
The following tips include some mild spoilers for some mid game mechanics. I'll try not to spoil anything major and reveal things progressively, but if you're really allergic to spoilers, I would suggest not reading onwards until you've reached room 46 at least once, and are starting to hit a brick wall in terms of things to explore and try.
Drafting tips
1. Read all the in-game books.
There are 5 drafting guide books discoverable in-game which provide valuable tips on how to draft consistently.
The following paragraph includes their locations if you need help finding any of them.
Their locations are: The first is in the Dormitory. The second in the Drafting Room.Third is in the Library. Four and Five are available in the library after purchase from the bookstore.
2. Build branches, not trunks.
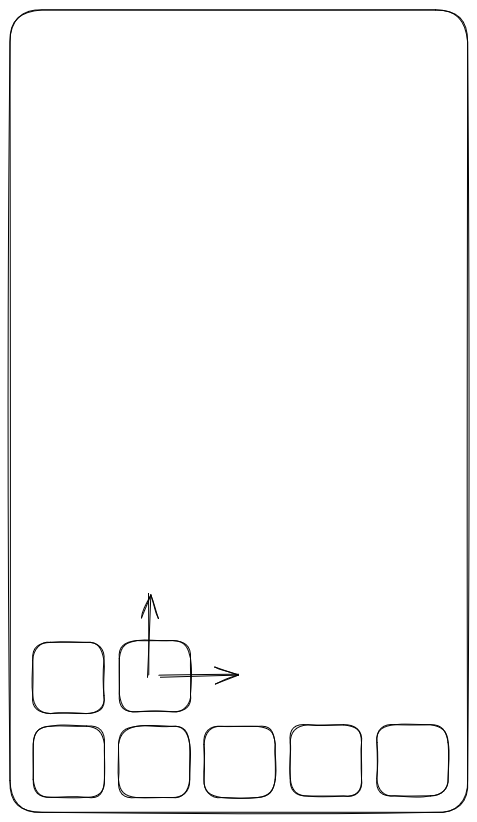
One of the drafting guides suggests that you should fill the bottom ranks before getting to the higher ranks. This might suggest that you should fill rank one before starting on rank 2 and so forth. This is actually the biggest tip I had to actively reverse as I got better at drafting.
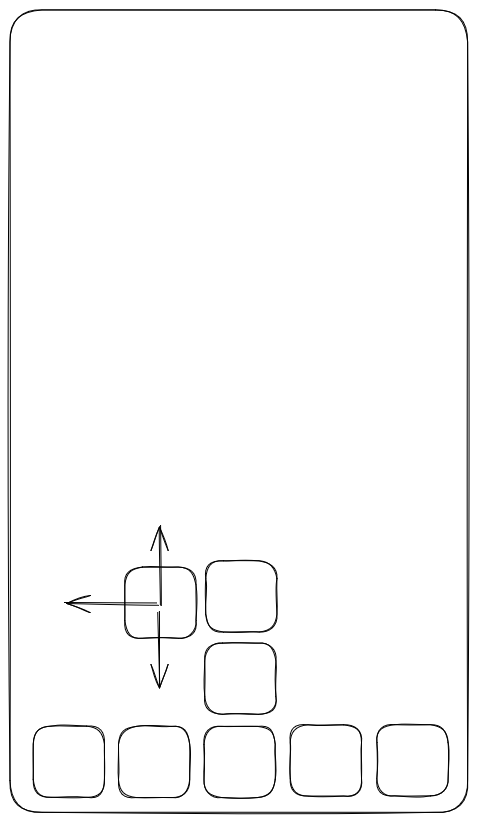
The problem is that if you've always filled rank N-1 already, then you'll average 2 or maybe 3 open sides when drafting. If you get unlucky with corners, then its very easy to have a bad draw or two and end up deadlocked.

However if you first branch forward a rank or two, then double back, you have a much more open plan to draft in, averaging closer to 3 open sides. So I tend to draft a couple rows forward, then double back to fill in gaps with dead ends. In this way you'll still try to fill ranks 1-3 before you invest too much in rank 6, but can be more flexible about how you draft into an open plan. It might not seem like much, but that one extra degree of freedom helps a lot and prevents misdrafts. Being able to confidently fill a lot of dead-ends in the first few ranks also then removes them from the drafting pool. Compare to above where placing a dead-end into either position would make the other draw all-or-nothing to continue the run.

- Don't focus on a single goal.
Have a list of all your current goals and what drafting combinations it would take to reach them. Most of the time there are multiple things to pursue and noticing ahead of time what pieces you come across towards any one goal will help you progress faster.
Permanent Buffs
The overall tip here is that whenever you're presented with the option to do something that will apply a permanent buff and carry forward to all future runs, you should prioritise it highly.
There are a couple of ways to apply this.
Upgrade Disks
Whenever you use an upgrade disk, you'll have three options. I've found a lot of mileage in making sure that whenever possible, you should take the upgrade that gives lasting benefits. There are a few in particular which have been MVP's for my play so far.
Exterior areas
If you're reading this far, hopefully you have already done some work unlocking exterior areas. All of these unlock permanent, lasting upgrades. I'm going to try to progressively hint towards these, but you should skip if you want to discover these yourselves
Area 1
Area 2
Area 3
Area 4
Important rooms
Finally there are also a few key rooms and blueprints that will supe up your runs. I wouldn't recommend reading more if you haven't already unlocked all of the above exterior areas.
- Observatory - This is an obvious one but you should probably figure out quickly that the more stars you have, the more bonuses you get. Consistently drafting this will eventually get you a lot of bonuses.
- A room unlocked via inspection of the music sheets
- The Conservatory allows you to mess with rarities of rooms, in effect forcing the ones you want early and lowering the ones you don't want.
- Good candidates for 'common' are quest bedroom, observatory, the den, parlor, security room, commissary, and showroom.
- Good candidates for 'rare' are the lavatory, maids room, and any other rooms you don't like seeing.
- You can see how these permanent rarity modifications combined with rarity mods also start to stack. By making the Security room common, I could consistently get an early experiment fired up for resources, along with setting security to high (because I of course ended the day in the break room the previous day) to lower keys needed.
- A room unlocked by a challenge involving the pump room or gas valves
- Once you get downstairs outside, you'll find the chess puzzle which - once solved - gives you a choice of permanent boons. My strategy was the following.
- The Armory was unlocked first, so I could buy the axe (appears to be max three times) which permanently makes a room free. I used the axe on highly desirable but pricey rooms - in particular - the Cloister, Passageway, and Vestibule.
- Then the bishop to get an extra 30 coins from the chapel every day.
- Then once my allowance gets above 100 I plan to change to the Rook for free corner rerolls.
- A room locked behind a hidden red door
- If you've found the above mentioned area but don't know how to open it, you can look to the Boiler Room
- If you don't know how to open the combination lock, the least spoilery hint I can give is to consider what other red things are locked away and how you got to them.
- A more spoilery hint - this is a safe, and is opened with the same kind of concept that has unlocked every other safe you've found.
- Finally the room in question is the Treasure Trove which functions similarly to the Observatory, climbing in value each time you draft it. I found this less useful than increasing the allowance because you have to find it each day - but I expect if I can lower the rarity of this room and the Showroom it will become a more consistent part of my approach.
One final clue
This last is a clue only if you are getting towards the end of the second major goal and are getting stuck.
- Is it a final clue you need or rather a new clue?
- Look for the Bookshop and make sure you have everything.
- If that's not enough to help you move forward, two key insights that helped me:
- There is a page with numbers hidden in the gaps between words. The insight here - each number only appears once.
- The page with the main character sitting in the Records room contains a visual hint for what to do in a place with a thing. Take careful note of every object on the page and consider where you've seen them before.
